iOS Integration - Getting started
A full working example app is available on this repository. Run to see Nextome Sdk in action. It also contains a seamless outdoor/indoor map integration using OpenStreetMap for outdoor and Nextome Flutter Map for indoor.
Prerequisites
- Xcode 15.0
- Make sure that your project meets these requirements:
- Swift 5.7
- Minimum deployment: iOS 13.2
- Have credentials for jFrog
- Have credentials for our portal
How to include
Cocoapods
Nextome Localization Sdk is distributed with Cocoapods using our Podspec repo. Be sure to have CocoaPods installed, or follow this guide to install it.
Then it is necessary to configure our Spec Repo.
-
Add credentials in the netrc file
Copy this then close and saveNote
If you get an error of this type: "Permission bits, should be 0600, but are 644"
Run this command:
chmod 0600 ~/.netrc -
Create a Podfile if you don't already have one. From the root of your project directory, run the following command
-
To your Podfile, be sure that the platform is at least 13.2 then add the CocoaPods specs source and our Nextome source. Then add the NextomeLocalization pod
-
Install the pods, then open your .xcworkspace file to see the project in Xcode
-
Open your
xcworkspacefile
Setup
In order to work properly the SDK requires to setup some permissions and capabilities:
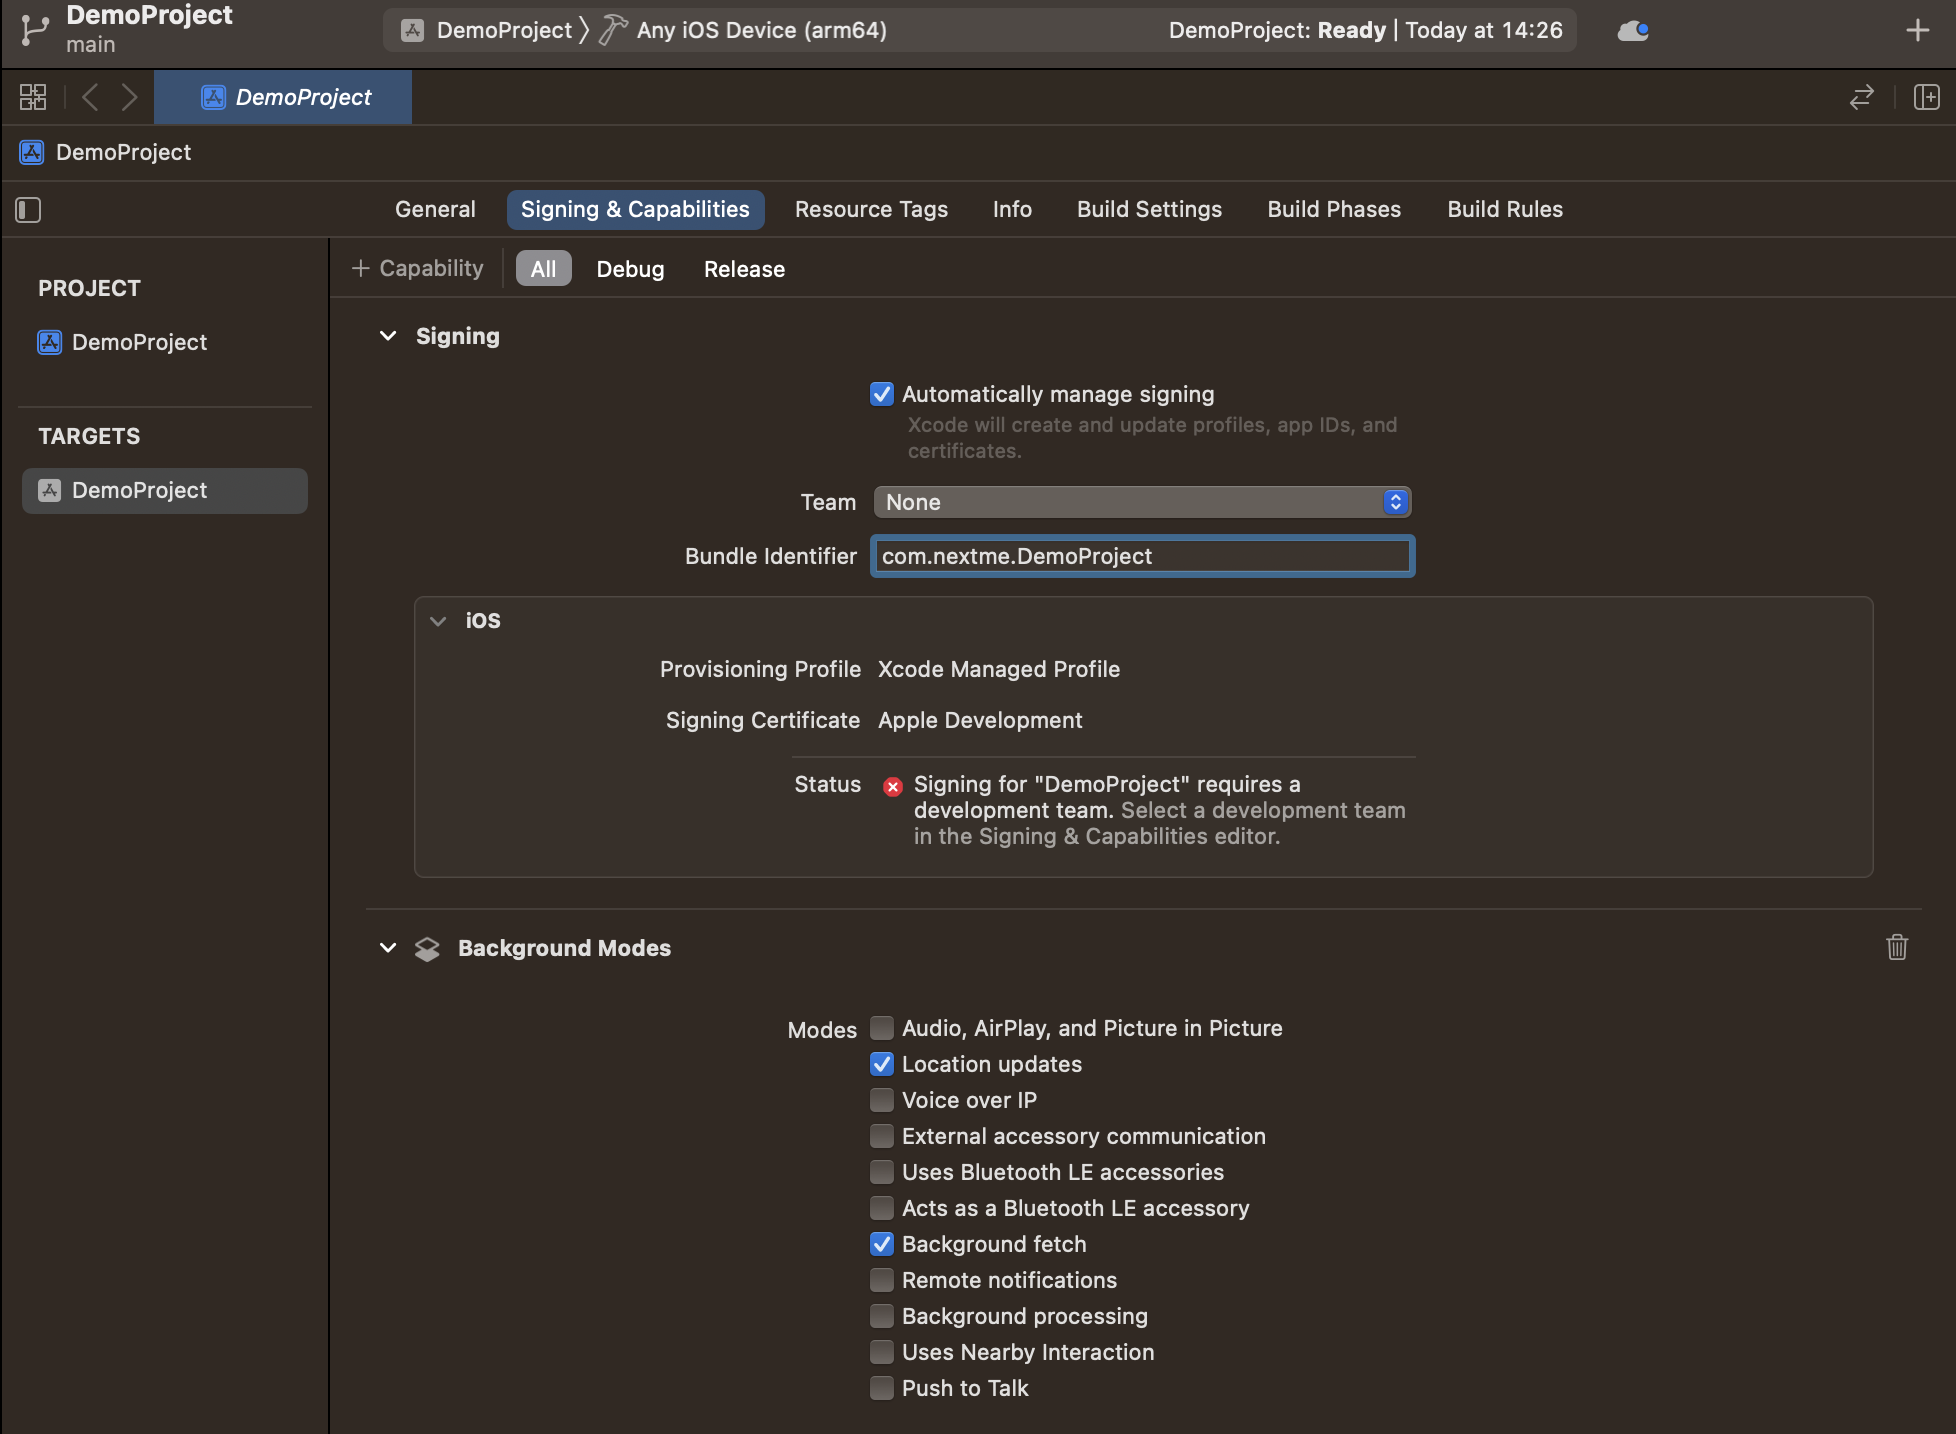
Add Background capabilities
If your app needs to compute the position even if it is in background, it is required to add the background capability.
- Select your project in Xcode’s Project navigator.
- Select the app’s target in the Targets list.
- Click the Signing & Capabilities tab in the project editor.
-
Add the background capability

-
Add background processing and Location Updates
Add permissions
Add these permissions in the info.plist:
- Privacy - Location Always and When In Use Usage Description
- Privacy - Location Always Usage Description
- Privacy - Location When In Use Usage Description
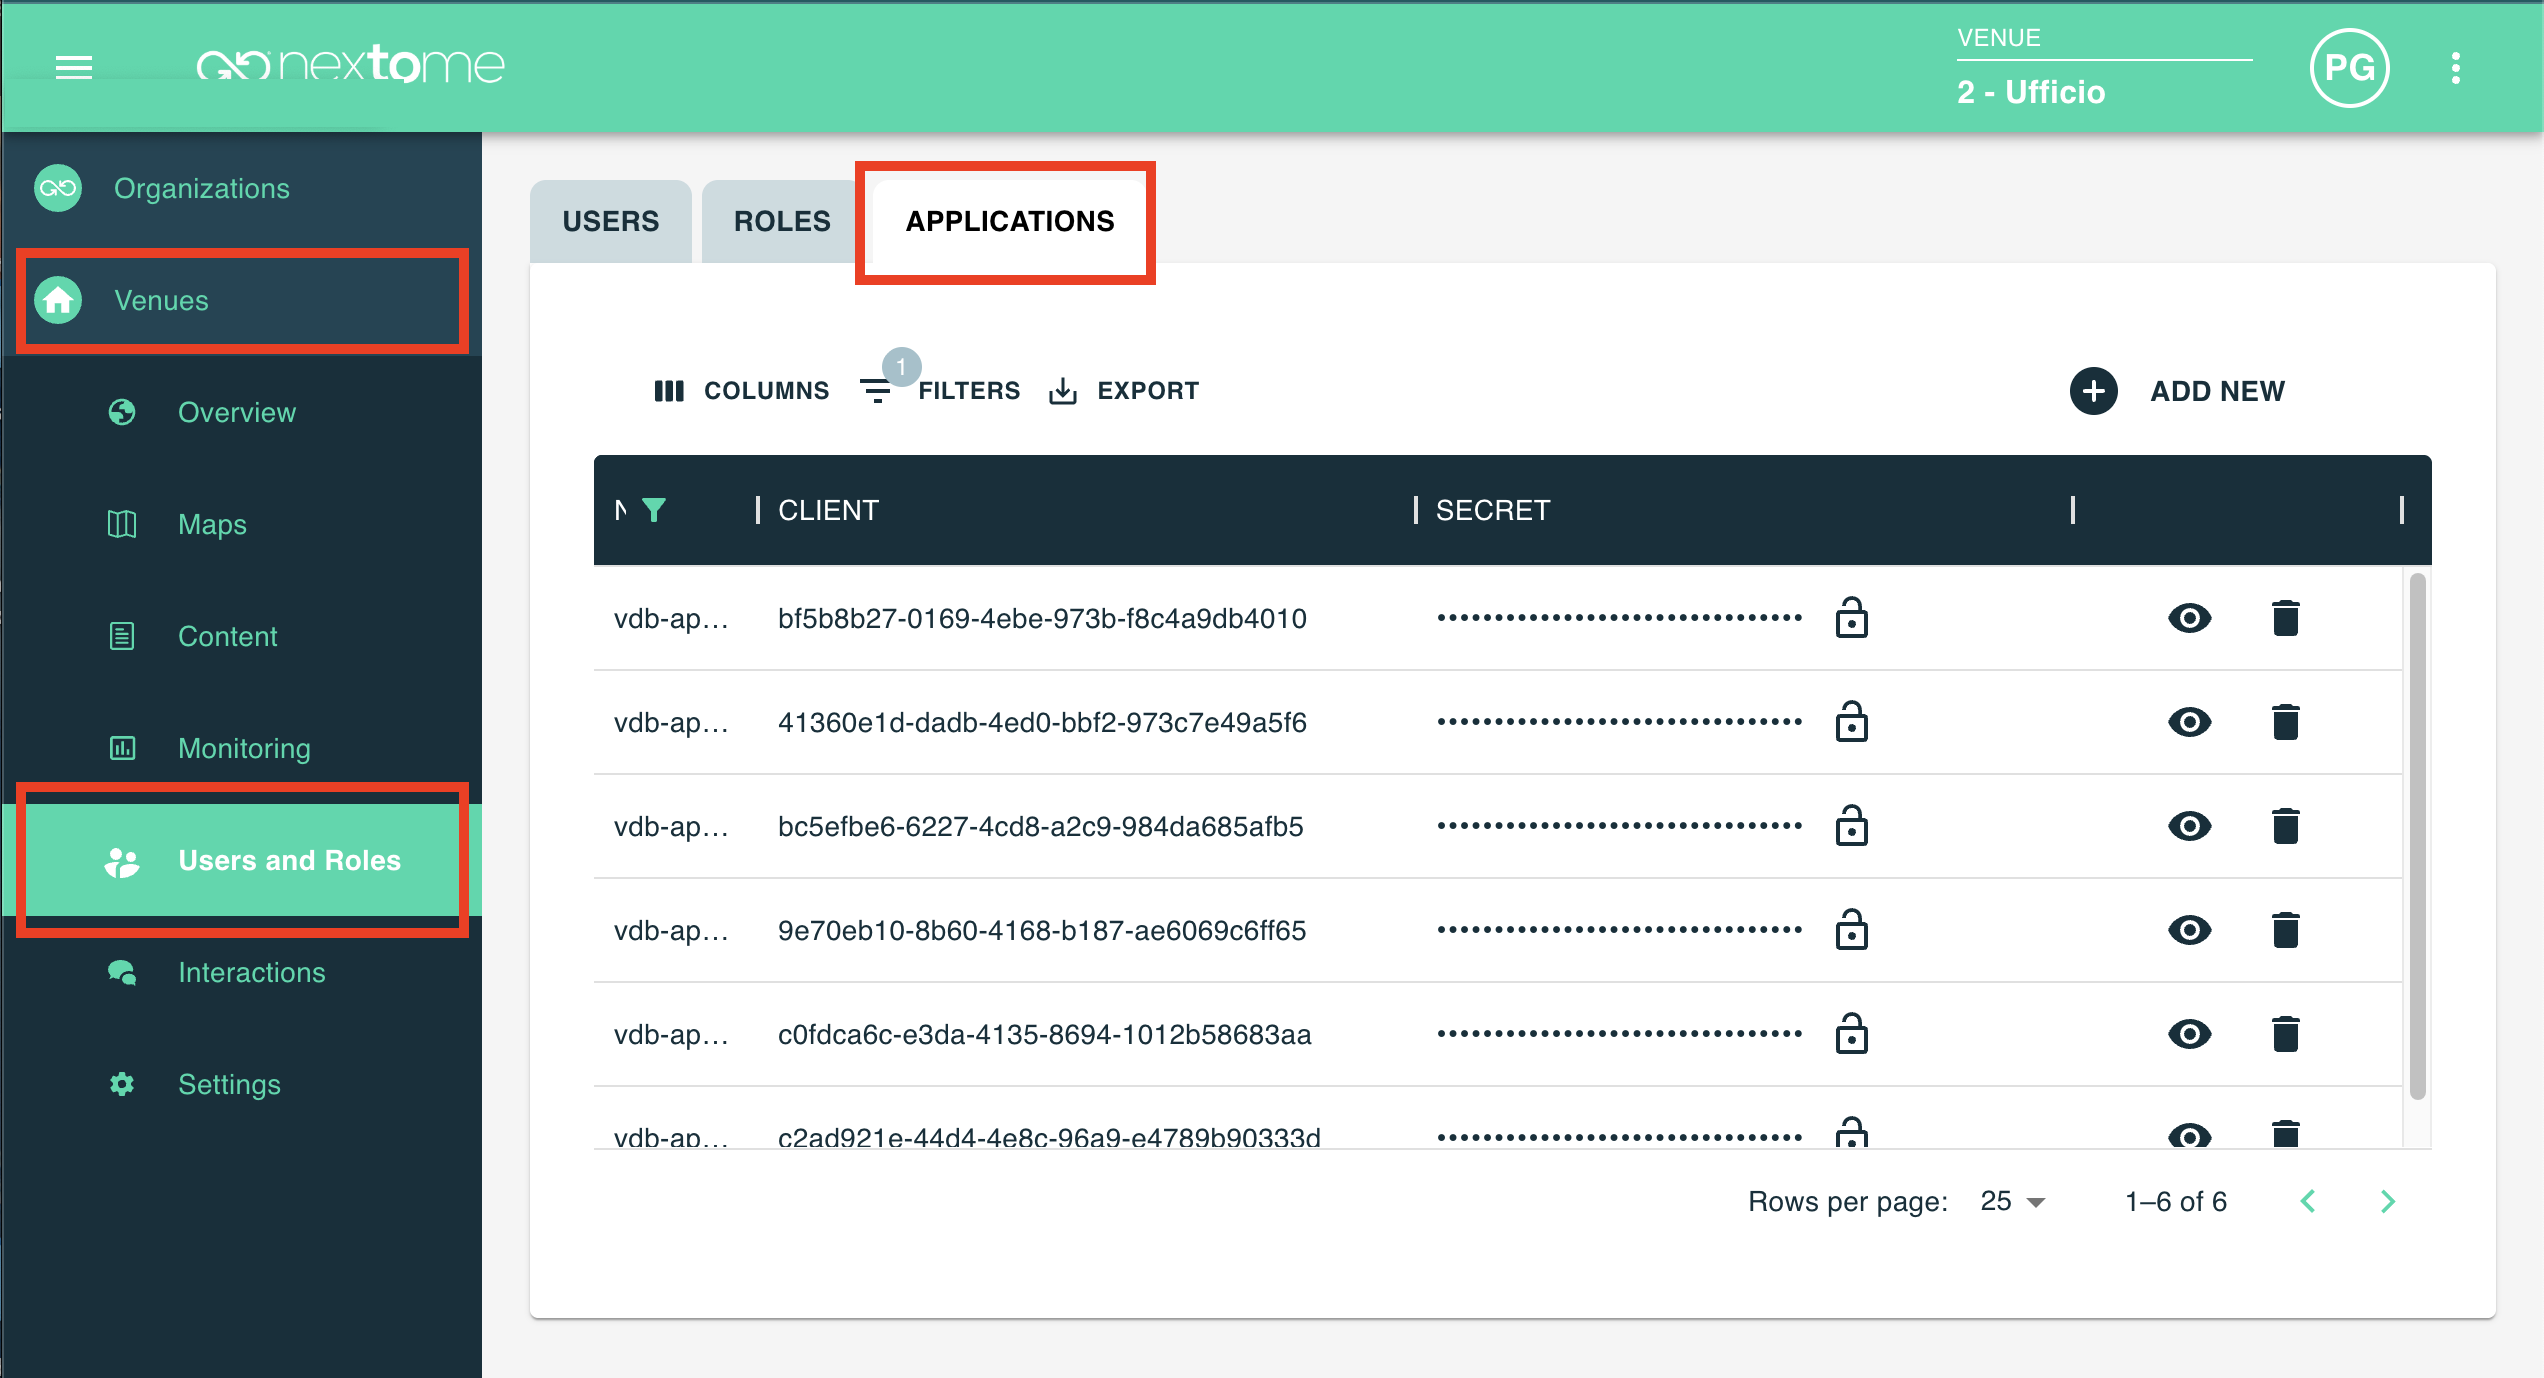
Retrive SDK Credentials
Log-in the web dashboard and retrieve the Client and Secret Key for the SDK.
Those credentials are available from choosen Venue, Users and Roles at the Applications section.
SDK Initialization and authentication
It is possible to access all the methods of Nextome using the class NextomeLocalizationSdk.
The SDK supports two authentication modes.
Firsty import the Nextome Localization SDK Module
ClientSecretCredentials
This is the recommended option when you use the Nextome infrastructure. In this case, authentication is performed using the Client ID and the Secret Key provided by Nextome.
It requires the given Client and Secret Key.
Note
It is possible to generate or invalidate a given Client and Secret Key using our web frontend.
val nextomeSdk = NextomeLocalizationSdk(
    baseUrl = nil
    credentials = ClientSecretCredentials(
        clientId = CLIENT_ID,
        clientSecret = CLIENT_SECRET
    ),
    canDebug: false
)
When baseUrl is left to null, the SDK uses the default Nextome infrastructure.
TokenCredentials
This option is intended for integrations that use a custom infrastructure and a custom identity provider. In this case, authentication is performed directly through a token.
val nextomeSdk = NextomeLocalizationSdk(
    baseUrl = "https://your-own-infrastructure.com"
    credentials = TokenCredentials(
        token = ACCESS_TOKEN
    ),
    canDebug: false
)
When using TokenCredentials, the SDK does not manage token refresh automatically. The token refresh flow must be handled by the integrator and by the host application. When the token expires or network calls are no longer authenticated, the application must obtain a new token and notify the SDK through:
Which credentials should I use? In general, ClientSecretCredentials should be used when the application relies on the Nextome infrastructure. This is the simplest and recommended setup.
TokenCredentials should be used when the application has its own infrastructure and its own identity provider. In this scenario, the SDK can be pointed to the custom backend through baseUrl, and authentication is handled through access tokens generated by the host system.
Notes If baseUrl is null, the SDK uses the Nextome infrastructure. If you use TokenCredentials, token renewal is not handled by the SDK. The host application is responsible for obtaining a new token and passing it to the SDK with assignNewToken(newToken: String).
Note
By default the SDK works with settings defined in the web portal.
The NextomeLocalizationSdk.Builder allows to override some of those as described in the next sections.
But please notice that this operation is extremely dangerous and should only be made in accordance with the Nextome Team because has an huge impact on the localization's performance.
Usage rules permissions
To be localized, the application associated with the client_id entered during initialization must have CORE permissions. These permissions are:
- At least Read permission on the Venues resource
- At least Read permission on the Maps resource
- At least Read permission on the Beacons resource
- At least Read permission on the BeaconModels resource
If the core permission are not granted, the SDK will not works. Check the role type assigned to the user on the Nextome Hub.
- At least Read permission on the Settgins resource
This permission is not intended to be as core permissions, so no error is fired but it is recommanded to fetching the venue settings correctly. For example, if you don't see realtime position on Hub Web, but the settings is setted on TRUE, maybe the account associated roles haven't READ on Settings resource.
Next steps
- See Start Localization to use Nextome SDK.
Examples
A full working example app is available on this repository.
© 2026 Nextome srl | All Rights Reserved.